ArcGIS Self-Service Support

ArcGIS is available in an online version, and a desktop version for Windows computers called ArcGIS Pro, both detailed on this page. If you don’t want to download ARCGIS, you can use it online. Online is also a good solution for Mac users.
ArcGIS Online
Requesting New Access:
- Go to SlugHub: https://slughub.ucsc.edu/its
- Click Get Help
- In the fields asking about the issue, type “New ArcGIS user” and in the longer message field: “I need to be added as a New ArcGIS user. I need the online version, not the Windows desktop version.”
- Click the Submit button to create a ServiceNow ticket.
- You will receive an email that your account has been created, and it will invite you to set up a password and security question. Then you will be logged in.
Logging into your MyEsri / ArcGIS Account:
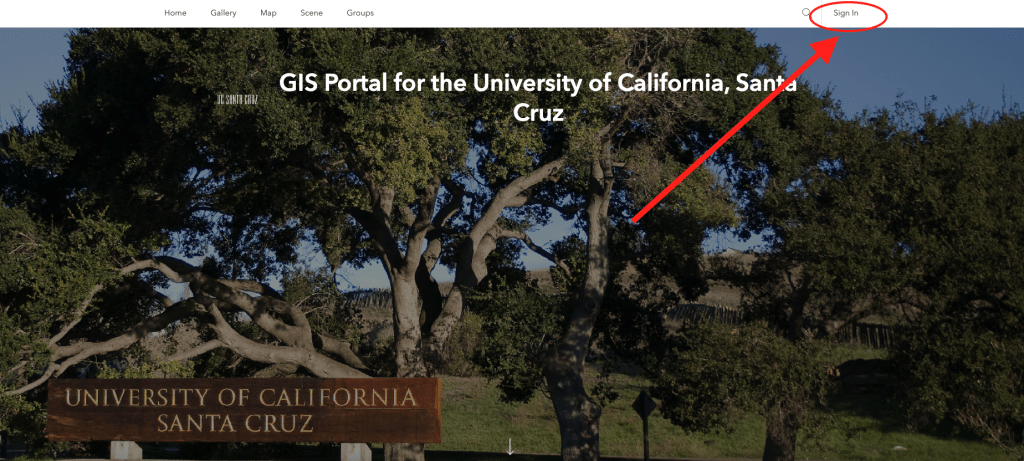
- Go to UCSC’s GIS Portal: https://ucsc.maps.arcgis.com
- At the top-right of the page, click Sign In.
- Click the blue University of California Santa Cruz button.
- Enter your CruzID and Gold password.
- Enter your Multi-Factor Authentication.
ArcGIS PRO (Downloadable version)
To install the Windows desktop version of ArcGIS, first create an account as described above, and then continue with the following steps. ESRI does not support ArcGIS for Mac or Linux at this time.
NOTE: The product called ArcGIS Desktop, also formerly known as ArcMap, has been replaced by ArcGIS Pro.
System Requirements:
| Component | Minimum | Recommended |
| OS | Windows 10 (64-bit) | Windows 11 |
| CPU | 2 cores with multi-threading | 4 cores with multi-threading |
| Storage | 32 GB of free space | 32 GB of free space on a solid-state drive (SSD) |
| RAM | 8 GB | 32 GB |
| Graphics | Integrated GPU | Dedicated card with 4 GB VRAM |
| Resolution | 1024×768 | 1920×1080 (1080p) or higher |
Software Prerequisites:
Try installing ARCGIS PRO and it may work without downloading these. If it alerts you that you need either of the programs below, here’s where to download them:
- DirectX 11 (included with Windows 10 and 11)
How to install the latest version of DirectX (external link)
- Microsoft .NET Desktop Runtime 6.0.5 (x64) or later
Download .NET Desktop Runtime 6.0.5 (x64) from Microsoft (external link)
Downloading ArcGIS Pro:
- Go to UCSC’s GIS Portal: https://ucsc.maps.arcgis.com
- At the top-right of the page, click Sign In.
- Click the blue University of California Santa Cruz button.
- Enter your CruzID and Gold password.
- Enter your Multi-Factor Authentication.
- At the top-right, click your profile icon.
- Click MyEsri to be redirected to your MyEsri Overview page.
- At the top of the page, go to the Downloads tab and click All Products and Versions.
Note: If there is no Downloads tab, it means that your account is not authorized to download software.
a. Go to the Overview tab and click Request Additional Permissions.
b. Click contact MyEsri administrator to submit a message. Please specify which additional permissions you require. - Under Core Products, click ArcGIS Pro.
- Click to Accept the Terms and Conditions.
- On the Download tile, confirm that your Language setting is correct.
- In the list of product components, in the Action column next to ArcGIS Pro, click Download to get the core installer.
Installing ArcGIS Pro:
- Open the downloaded ArcGIS Pro core installer file.
- Browse to a destination folder for unpacking the archive.
- After extraction is complete, navigate to the extraction folder.
- Run ArcGISPro.exe and follow the prompts.
- For Installation Context, select Anyone who uses this computer (all users) and click Next.
- Leave the default installation directory as C:\Program Files\ArcGIS\Pro, and click Next.
- Accept the Terms and Conditions and click Next.
- Choose whether you would like to participate in the optional Esri User Experience Improvement program, and click Install.
- If Windows User Account Control asks for permission to proceed, click Yes.
- Click the Finish button to exit when installation is complete.
Note: You may now safely delete the folder used for archive extraction in Step 2.
It is usually in your Documents folder (C:\Users\<username>\Documents\ArcGIS Pro).
Creating a New Single Use License / Renewing a Single Use License:
- Launch ArcGIS Pro from the Start Menu.
- At the bottom of the login window, click Configure Licensing.
- For License Type, select Single Use License from the drop-down menu.
- At the bottom of the window, click the Authorize button.
- Enter the authorization code you received by email.
