SocSci Drive
The SocSci Drive is Social Sciences’ Secure Shared Drive which provides essential shared drive file storage and supports reliable, consistent backup/restore services.
The “SocSci Drive” consists of ten separate departmental servers that support instruction, research, and administrative needs. SocSci Drive also allows you to share your files with others, accessible from anywhere, including off-campus, and supports Macs and PCs. SocSci Drive has its own rigorous and proven backup plan that will keep your vital data safe.
If you need help, please contact us:
If you are part of the Social Sciences faculty and staff and you need help with this, please email us at socsci-it@ucsc.edu.
Are you setting up on a Mac or a PC?
Instructions for setting up on a Mac
Instructions for setting up on a PC
How to connect your Mac to SocSci Drive:
Important Note:
- In order to access SocSci Drive from off-campus or not using campus wifi, you’ll need to make sure to use the UCSC VPN.
- OR you can connect to SocSci Drive while on campus, when you are connected to a secure campus internet connection: Just connect to an ethernet cable, or wirelessly to: Eduroam, Resnet, UCSC-Guest, UCSC-Devices, or similar.
Connect to SocSci Drive:
1. Click on Finder icon to open the Finder app:

2. Once Finder is open, press the Cmd key (⌘) and the letter k at the same time, and then you will see a window open asking for the Server Address at the top.
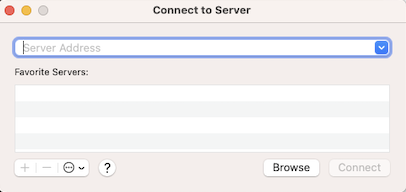
3. In the "Server Address" field, type your Server Address from this table below.
SocSci Drive Servers and Folders
| Department | Server Address | Project Folder |
|---|---|---|
| Anthropology | smb://anth-files.ucsc.edu | ANTH-Projects |
| Economics | smb://econ-files.ucsc.edu | ECON-Projects |
| Education | smb://educ-files.ucsc.edu | EDUC-Projects |
| Environmental Studies | smb://envs-files.ucsc.edu | ENVS-Projects |
| Latin American/Latino Studies | smb://lals-files.ucsc.edu | LALS-Projects |
| Politics | smb://poli-files.ucsc.edu | POLI-Projects |
| Psychology | smb://psyc-files.ucsc.edu | PSYC-Projects |
| Sociology | smb://socy-files.ucsc.edu | SOCY-Projects or CMMU-Projects |
| Dean/Division | smb://dean-files.ucsc.edu | DEAN-Projects |
| Research | smb://research-files.ucsc.edu | RESEARCH-Projects |
For example, if you are Sociology Faculty or Staff, you would type: smb://socy-files.ucsc.edu
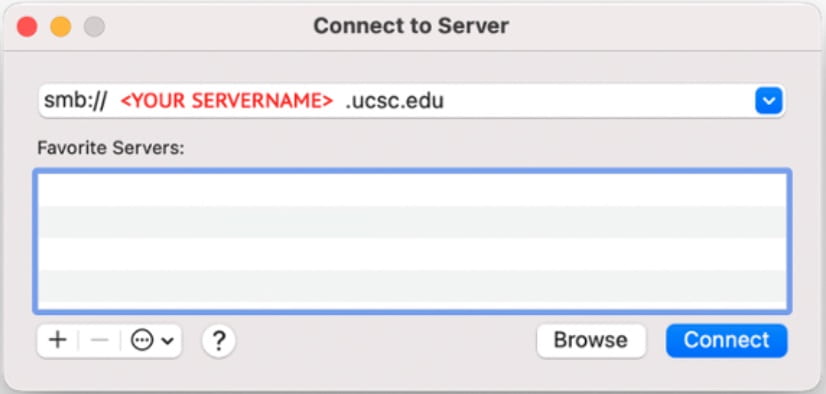
4. Next, click the “Connect” button.
Then you will see an option to select one of two folders.
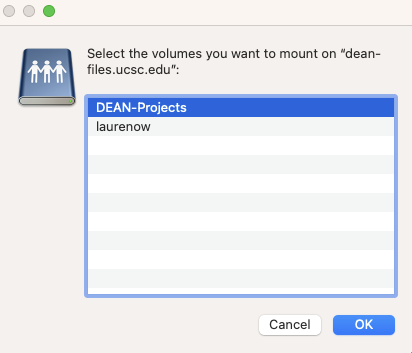
There are two folder options:
- Your department’s projects folder - shared folders specifically created for files to be used and accessed by multiple people. Typically named: (Your department abbreviation)-Projects. For example, for the shared Education folder, it is: EDUC-Projects
- Your folder that is assigned to you - This is for your backups and whatever other things you want to store for your own work and is not shared with anyone else. Typically named the same as your CruzID name. For example if your CruzID is JaneD, your personal folder name will be JaneD.
Select the folder you want to access and tap OK.
4. A new window will open. Select the second radio button, labeled Registered User, then for Name: enter your CruzID, and for Password: enter your Gold Password.

5. The SocSci Drive shared drive you selected will now be in the left column in any Finder window until you disconnect from VPN or the campus server.
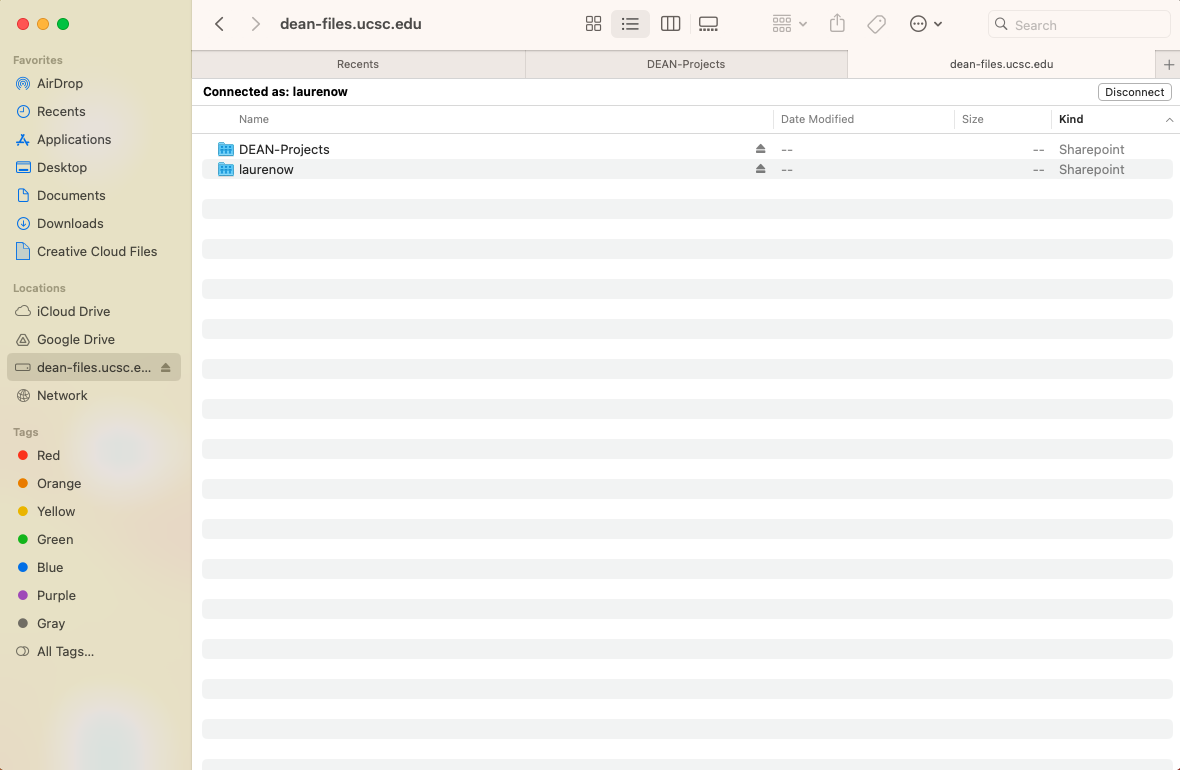
Congratulations! You have connected to SocSci Drive on a Mac!
Tip: Click on the SocSci Drive or a folder inside, and drag it to your Mac's dock if you want it to be in a an easy to see place at all times. You'll need to be connected to the VPN to access it.
More Help with Mac
If you are part of Social Sciences Faculty and Staff and you need help with this or other Computing and IT, email us at socsci-it@ucsc.edu.
How to Connect your PC to SocSci Drive:
Important Note:
- In order to access SocSci Drive from off-campus or not using campus wifi, you’ll need to make sure to use the UCSC VPN.
- OR you can connect to SocSci Drive while on campus, when you are connected to a secure campus internet connection: Just connect to an ethernet cable, or wirelessly to: Eduroam, Resnet, UCSC-Guest, UCSC-Devices, or similar.
Connecting your PC to SocSci Drive:
1. Select Start/window icon and type “Control Panel” in the search box. Open the “Control Panel“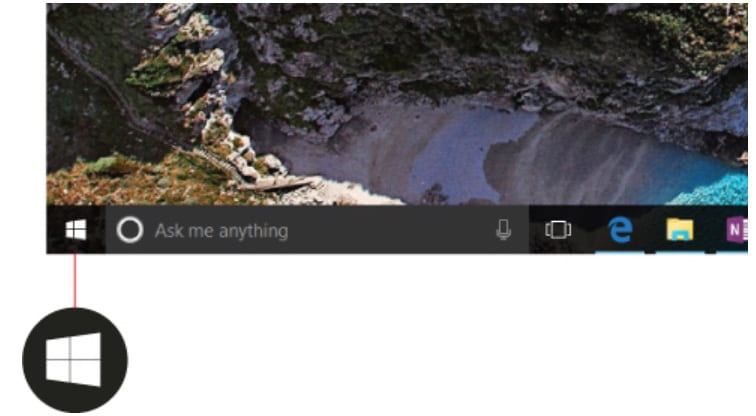
2. Select “User Accounts”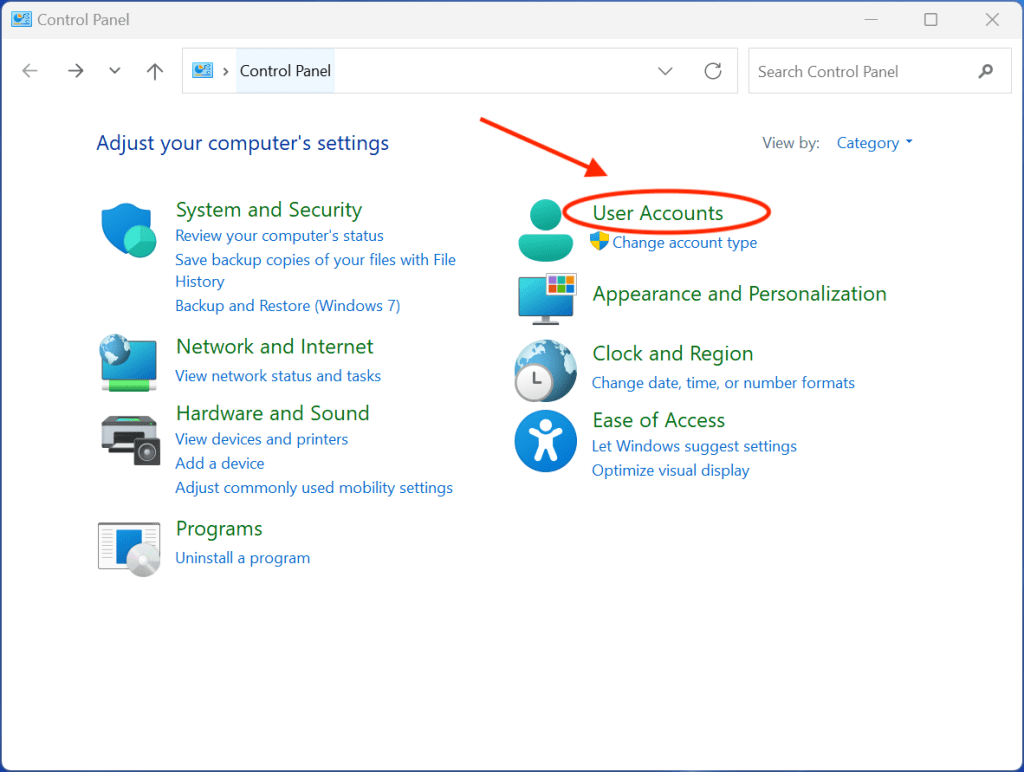
3. Under “Credential Manager“, open “Manage Windows Credentials“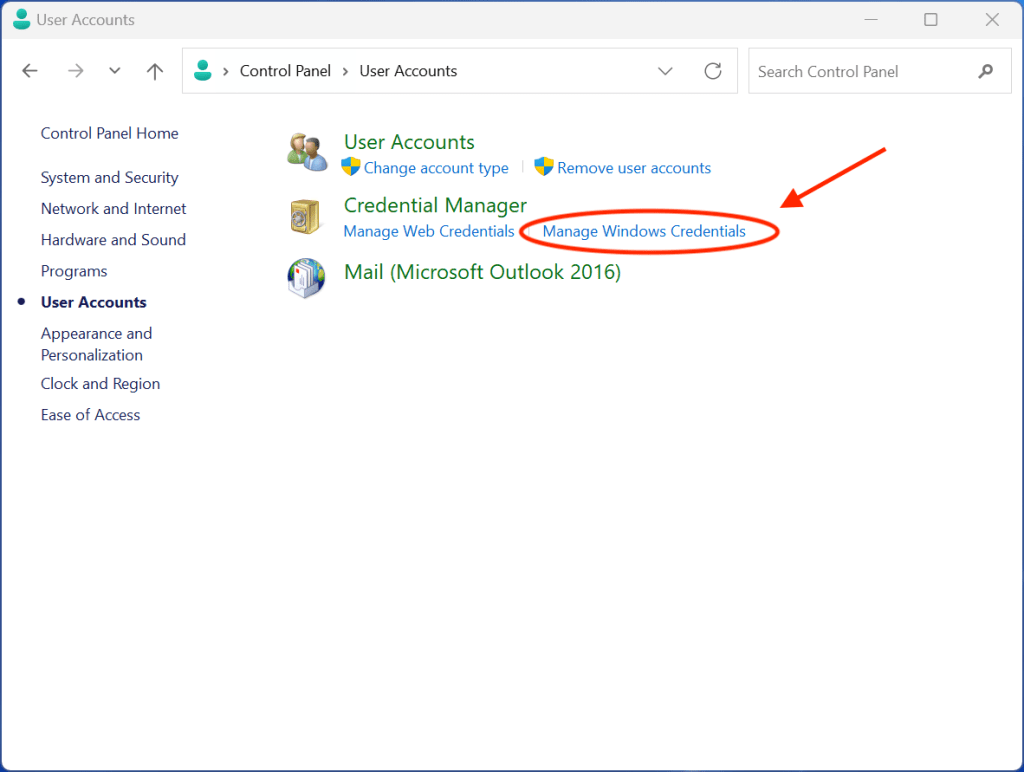
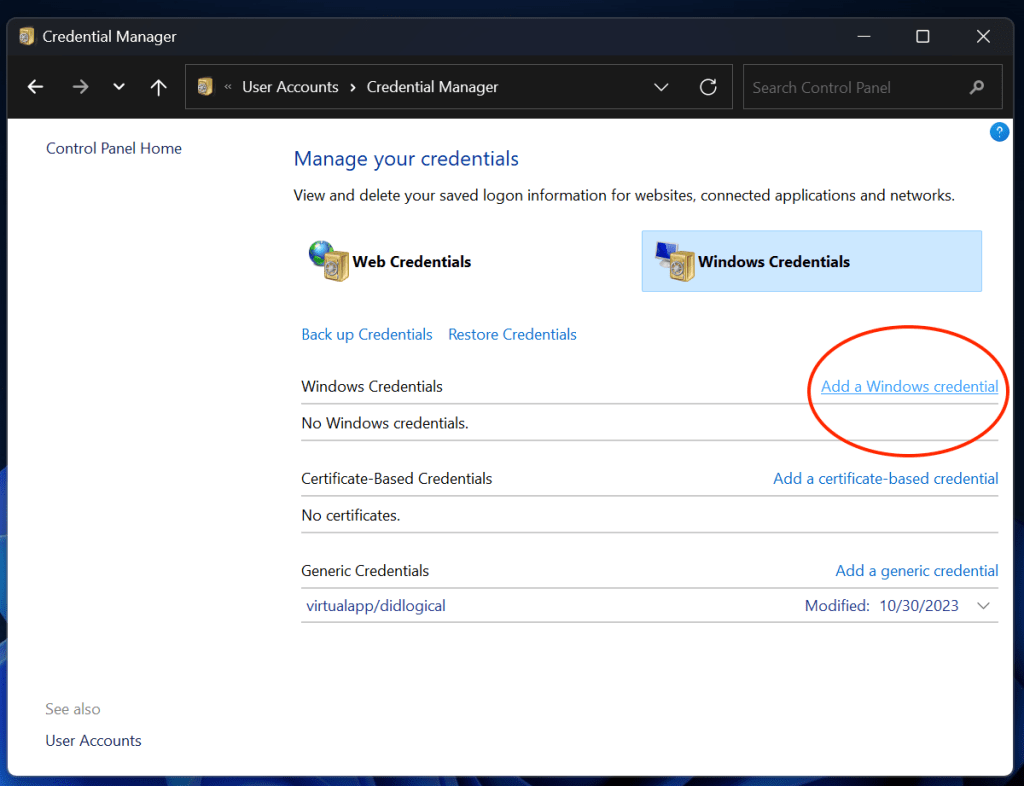
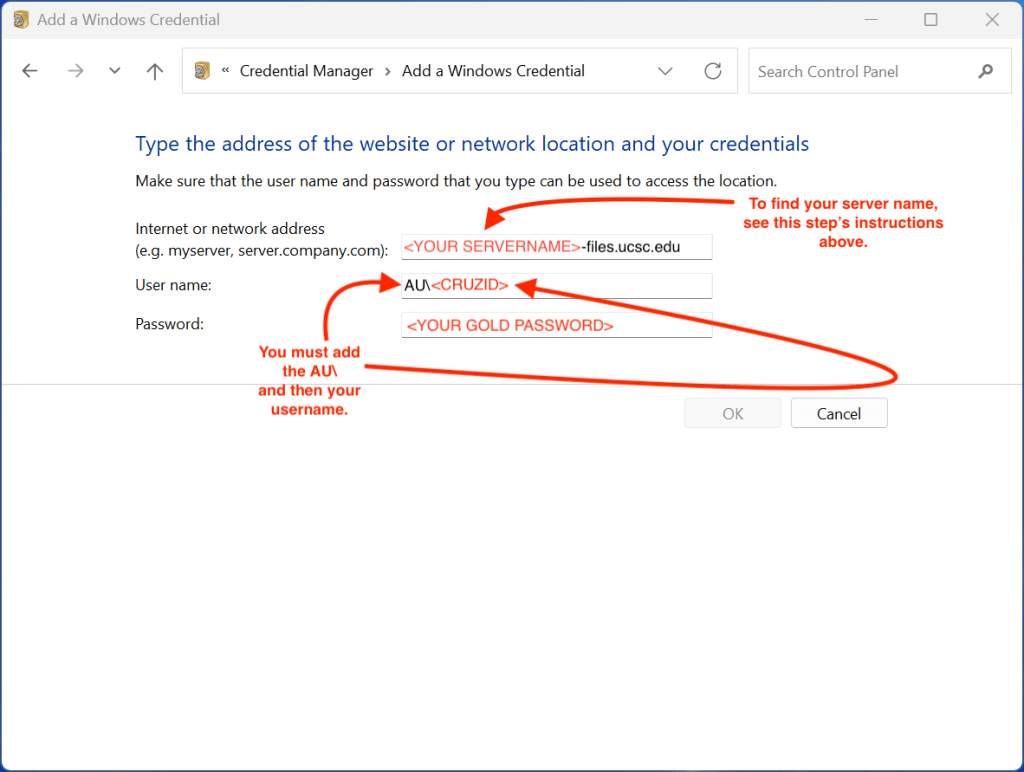
4. Click on “Add a Windows Credential“
5. Follow the steps below in the Add a Windows Credential Window:
- First, find your department's Server Address below:
SocSci Drive Servers and Folders
| Department | Server Address | Project Folder |
|---|---|---|
| Anthropology | anth-files.ucsc.edu | ANTH-Projects |
| Economics | econ-files.ucsc.edu | ECON-Projects |
| Education | educ-files.ucsc.edu | EDUC-Projects |
| Environmental Studies | envs-files.ucsc.edu | ENVS-Projects |
| Latin American/Latino Studies | lals-files.ucsc.edu | LALS-Projects |
| Politics | poli-files.ucsc.edu | POLI-Projects |
| Psychology | psyc-files.ucsc.edu | PSYC-Projects |
| Sociology | socy-files.ucsc.edu | SOCY-Projects or CMMU-Projects |
| Dean/Division | dean-files.ucsc.edu | DEAN-Projects |
| Research | research-files.ucsc.edu | RESEARCH-Projects |
- In the “Internet or Network Address” field, enter your department’s Server Address (Server Name). For example, if you are Sociology Faculty or Staff, you would type: socy-files.ucsc.edu
- In the “User name:” field, you will type “AU\” followed by your CruzID field.
- In the “Password:” field, enter your Gold Password then click OK.
Connecting to the Department Shared Folder, AND your Personal File Folder
Once the above steps are done, there are two options for connecting to folders:- Your Department’s Projects folder - shared folders specifically created for files to be used and accessed by multiple people. Typically named: (Your department abbreviation)-Projects. For example, for the shared Education folder, it is: EDUC-Projects
- Your Folder that is assigned to you - This is for your backups and whatever other things you want to store for your own work and is not shared with anyone else. Typically named the same as your CruzID name. For example if your CruzID is JaneD, your personal folder name will be JaneD.
Connecting to Your Department’s Projects Folder in SocSci Drive:
Right-click This PC. This will open up a list of options.

Click Map network drive.
- This will open up a new window.
- For Drive: type P: as it will give access to the communal projects.
- In the Folder: field, type \\SERVER-files.ucsc.edu\SERVER-Projects, replacing SERVER-files.ucsc.edu with the correct address from the Server Name column and replacing SERVER-Projects with the correct folder from the Project Folder column from the Servers Names and Project Folders.
- Note: Reconnect at sign-in should NOT be selected for a device you share with a co-worker.
- Click Finish.
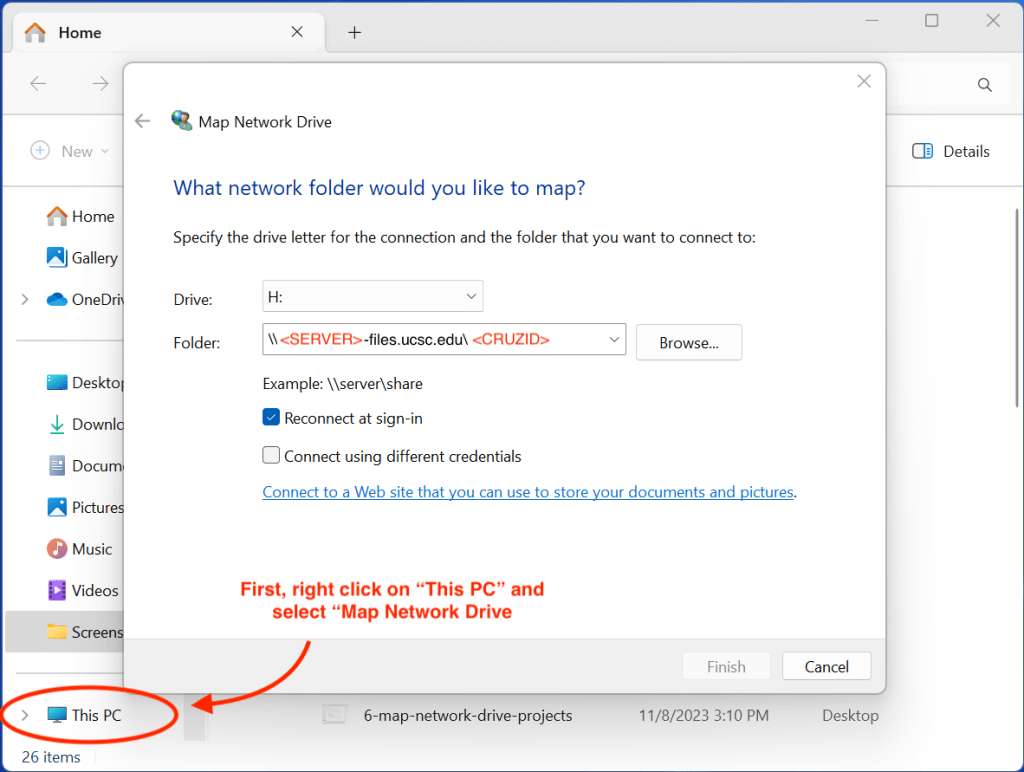
Connecting to your Personal Folder in SocSci Drive:
Reopen up file explorer and look to the left side of the window and right click This PC.
- This will open up a list of options. Click Map network drive which will open up a new window.
- For Drive: field, type H: as it will give access to your home folder within the server
- In the Folder: section, type \\SERVER-files.ucsc.edu\CRUZID, replacing SERVER-files.ucsc.edu with the correct address from the Server Name column from Server Names. Next, replace CRUZID with your CruzID.
- Note: Reconnect at sign-in should NOT be selected for a device you share with a co-worker.
- Click Finish.
Once Connected:
Congratulations, you are now connected to SocSci Drive. When you are connected to the VPN or a secure network, you can now easily access SocSci Drive.
When you double-click on any folder on your PC it will open a window (or Windows Explorer, also known as File Explorer). In that window, in the left side menu, you can find your folder(s), under “This PC.”

If you need help, please contact us:
If you are part of the Social Sciences faculty and staff and you need help with this, please email us at socsci-it@ucsc.edu.
